Shadowrocket
Setup and Connection Guide
Follow these five steps to get started: import existing details, choose a mode, connect, verify the result, and troubleshoot by failure stage. This guide covers hands-on use on iPhone and iPad. Start by confirming one working connection before adjusting more detailed rules.
- An Existing Subscription or Server Details
- Add Server / Subscribe
- Config / Proxy / Direct
- Connectivity Test
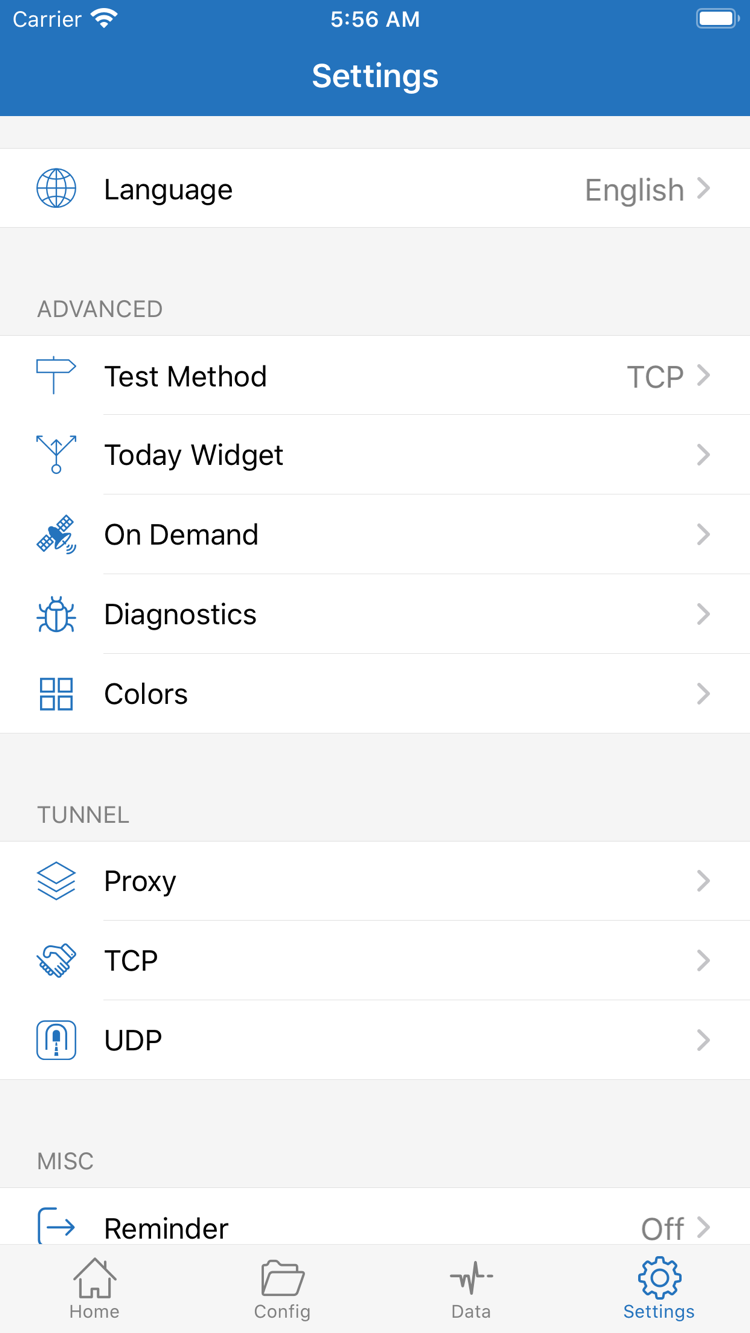
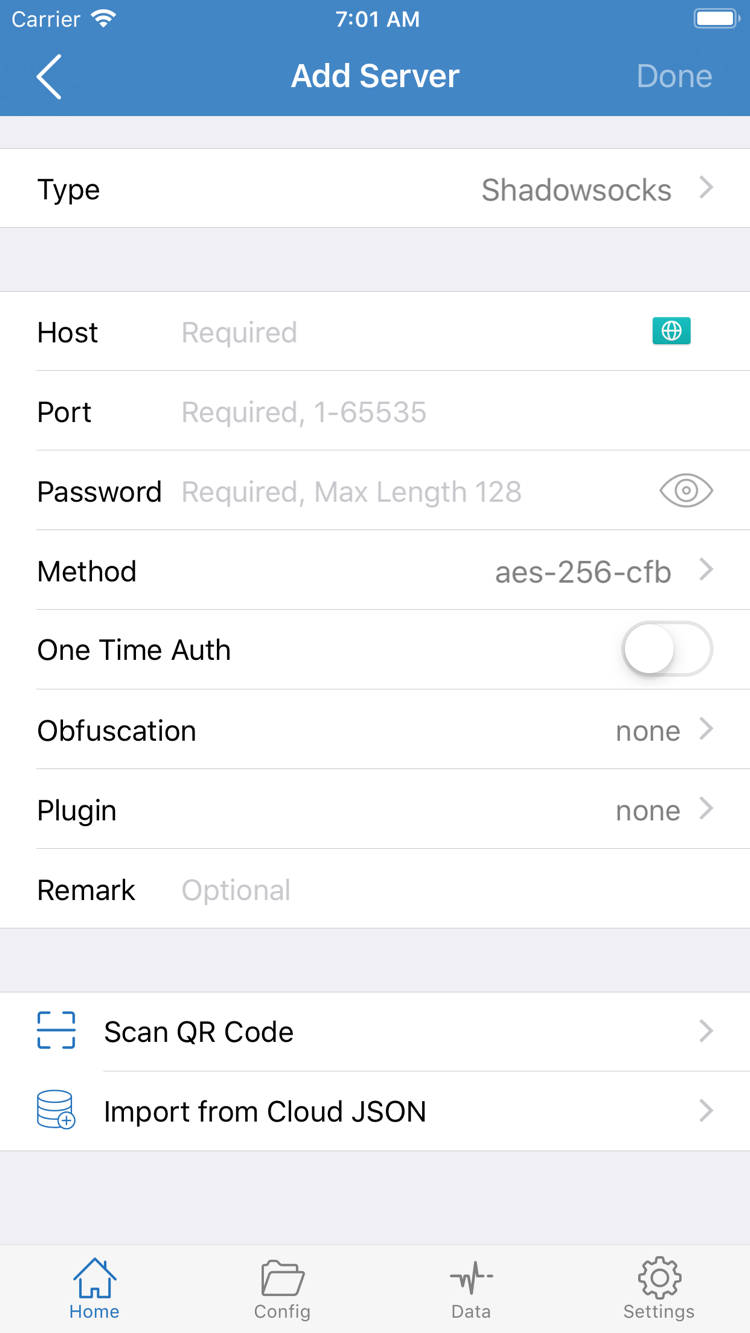
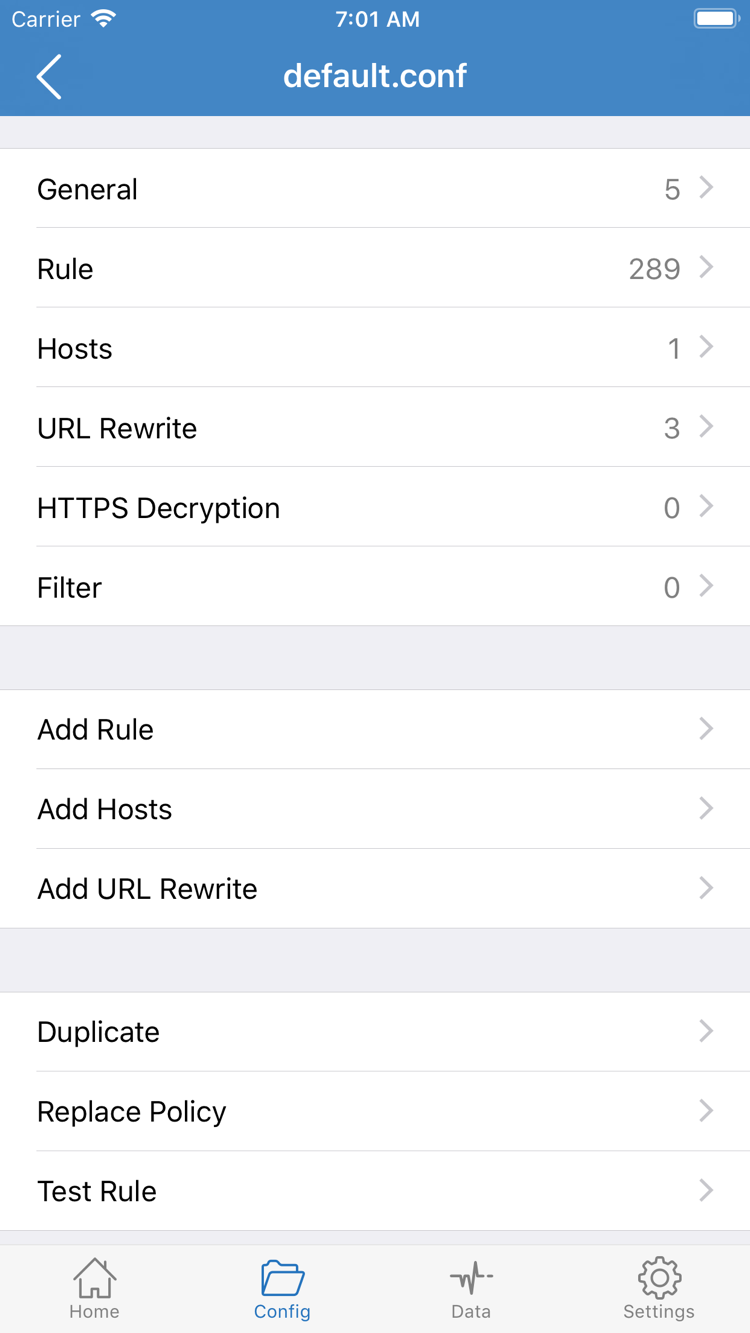
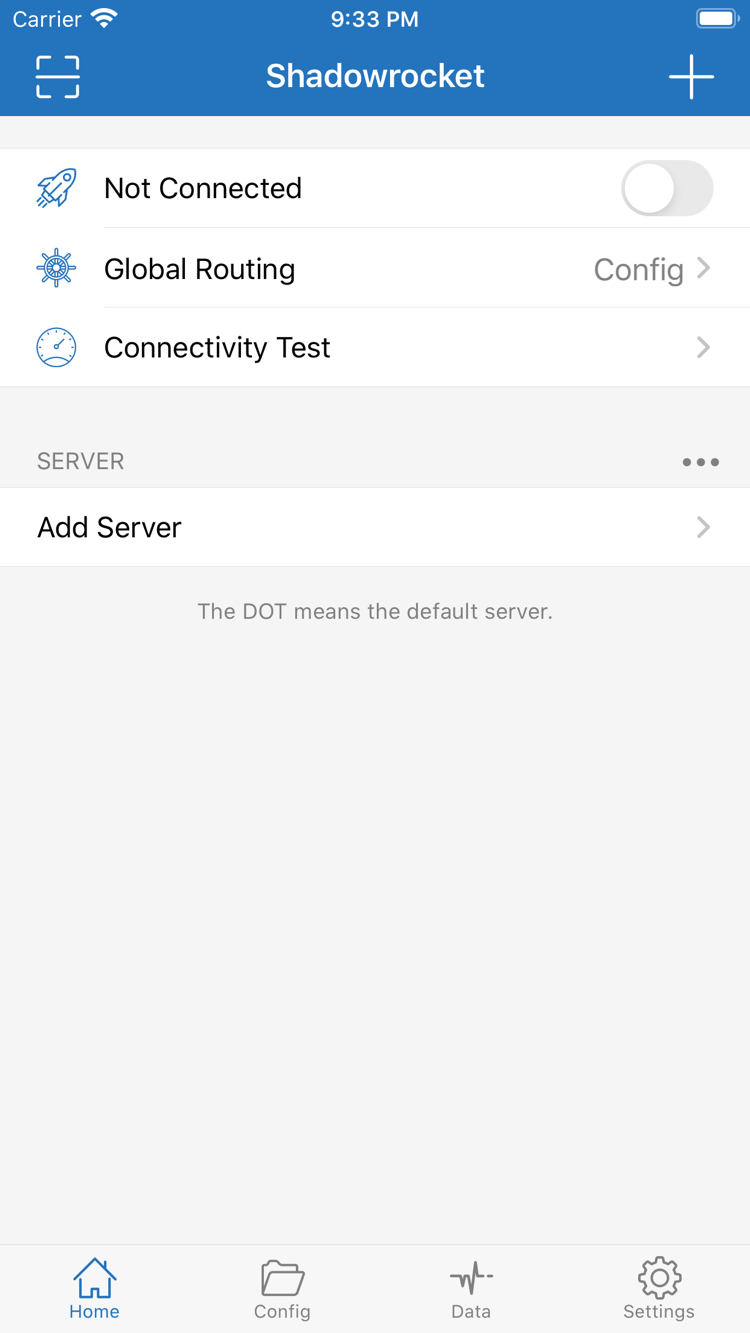
The images below are official App Store screenshots for identifying screens and fields. The entries shown in them are not usable connection details; options may differ in the current app.
Add Server / Subscribe: Add and Import
A server entry stores the settings needed for one connection. A subscription retrieves and updates a group of server entries. Start by identifying what you have: use Subscribe for a complete subscription URL; use Add Server to enter a protocol, address, port, and authentication details manually. You do not need to use both methods, and a subscription URL should not be entered in Host.
Have a Subscription Link? Choose Subscribe
Open Home in Shadowrocket, find Add Server in the SERVER section, and tap it. Open Type and choose Subscribe. Paste your own subscription link into the URL field, add a note to identify it, and save. Subscribe is for importing an existing subscription, not for purchasing the app. Return to Home and wait for the request to finish. Then check for a subscription group and server entries. If only the subscription name appears, confirm that the entries were retrieved.
Before pasting, make sure the link is complete, including parameters after the question mark, capitalization, and the final character. Remove any line breaks, extra spaces, or punctuation copied from a message. The example below shows only the URL format and cannot be used to connect. Use your own address, and never share a link containing real credentials on a public page or in a support screenshot.
https://example.com/sub?token=xxxxWhether a subscription updates depends on the link’s validity, your network, and the response from the subscription address. If an update fails, keep the existing entry, check that your subscription is valid, and then try refreshing it. Repeatedly adding the same URL usually creates duplicate groups and does not fix a failed request. If the subscription also involves routing rules, check Config separately; seeing server entries does not mean the active rules are ready.
Have Details for One Server? Fill In Add Server
In Add Server, choose Type first, then fill in the fields for that protocol. In the screen shown, Host is the server address, Port is the port number, and Password and Method must match your existing details. Fields may change when you select a different Type. For example, VMess and VLESS use different authentication and transport settings, so do not copy fields from one protocol to another. If a field is unfamiliar, check the Glossary before continuing here.
When entering details manually, check that the address has no extra path, the port is complete, and authentication details contain no accidental spaces. Enter TLS, transport options, and related hostnames as provided; do not guess values just to fill every field. If details are missing, ask the original provider to confirm them. Changing Type alone cannot supply missing parameters.
If you already have the relevant QR code, use Scan QR Code to import it, then open the entry and check its fields. Import from Cloud JSON is only for an existing configuration source in a compatible format; it is not a general replacement for a subscription URL. After saving, return to Home and confirm the entry appears under SERVER. This only saves the connection details. Next, choose how traffic should be handled.
The Three Global Routing Modes
After saving the server details, return to Home and open Global Routing. This setting controls how traffic is handled overall; it is not a server protocol or a way to update subscriptions. This guide uses Config, Proxy, and Direct, matching the labels in the app. Decide what you want to test before choosing a mode so a mode change is not mistaken for a server failure.
| Mode | How It Handles Traffic | When to Use It |
|---|---|---|
| Config | Handles connections according to the rules and policies in the active configuration. | Check that rule-based routing behaves as expected when you have a usable configuration. |
| Proxy | Routes traffic through a proxy, subject to the app’s and system’s actual handling scope. | Temporarily check whether the selected server can access a destination. |
| Direct | Handles traffic as a direct connection. | Compare access with your regular network connection. |
Check the Active Configuration Before Using Config
If you have a suitable rules configuration, open Config first and confirm that the configuration you plan to use is selected or enabled—not merely saved in the list. Open it and review the rules in Rule and their referenced policies. Official screenshots show sections including General, Rule, Hosts, URL Rewrite, and HTTPS Decryption. When getting started, focus on General and Rule; you do not need to change every section.
In Config mode, a request going direct may be exactly what the rules are intended to do. Rules are usually matched in order, so a request matched earlier will not be handled by a later final rule. This snippet is for illustrating syntax only: DOMAIN-SUFFIX matches a domain suffix, and FINAL handles connections that did not match earlier rules. PROXY must refer to an available policy or policy group in the active configuration. Do not use the example as a complete setup without adapting it to your configuration.
DOMAIN-SUFFIX,example.com,PROXY
FINAL,DIRECT
If you only have server details and have not confirmed a rules configuration, temporarily use Proxy to test the selected server, then return to Config to check routing. Direct is useful for comparing with your regular network; opening a page in Direct does not show that the selected server is working. After changing modes, return to Home and check the displayed setting. If you change modes while connected, repeat the access test rather than relying on the previous result.
You do not need to edit Add Rule or enable HTTPS Decryption for the first test. First understand how the existing configuration behaves, then make changes one at a time. See the Glossary for rule keywords and the Global Routing Mode Guide for more on the three modes. Once you have confirmed a mode, establish the system connection.
Select a Server in Home and Turn On the Switch
Return to Home and select the server you just saved or imported from a subscription under SERVER. Confirm it is the one you intend to test. If the subscription contains several entries, test one at a time. Avoid changing the server, mode, and configuration together, or it will be difficult to tell which change affected the result. If Config uses a policy group, also check the selected policy; the entry selected in Home may not be the one each rule ultimately uses.
Check the displayed Global Routing mode again to make sure it matches your choice in the previous step, then turn on the connection switch at the top of Home. When connecting for the first time, the system may ask for permission to add a VPN configuration for Shadowrocket. Make sure the prompt follows an action you initiated, then allow it and complete the requested device authentication. This permission is needed to establish a system network connection; it is not where you enter a server password.
After authorization, return to Shadowrocket and check whether the status at the top changes from Not Connected. If the switch turns off again immediately or still shows that you are not connected, first confirm system authorization, then check the selected entry and configuration. Do not assume the connection was established after dismissing the system prompt, or treat a briefly lit switch as successful verification.
The steps are the same on iPhone and iPad, though the layout may vary by device. The system VPN status can help confirm the connection state, but it cannot by itself prove that the remote server is reachable, domain resolution is working, or the rules are matching correctly. Run Connectivity Test and visit an actual page as well. If another VPN connection is already active on the device, check which one the system is using to avoid interference between connection attempts.
If you need to change server settings, turn off the connection first, edit the entry, save, then reconnect and test. When getting started, it is also best to leave On Demand unchanged: first connect and disconnect manually to confirm basic behavior, then set up automatic triggers. Keep the selected server and mode as they are for now, and move on to test whether the connection works in practice.
Connectivity Test and Real-World Access
Verify three things separately: whether the system is connected, whether the server test passes, and whether actual requests are handled as expected. These results are related, but none can replace the others. The system can show a connection while the server test fails; a test can return a result while a particular page still fails because of domain resolution, rules, the destination, or a different transport.
Run Connectivity Test from Home first. Wait for the results and note which servers pass or fail. Results depend on Test Method in Settings and the current network, so they do not guarantee access in every situation. Different test methods may check different kinds of reachability. For your first test, keep the current method rather than repeatedly changing settings just to get a number.
Next, open a browser and visit a page you already know is accessible. Refresh it and check that the content loads. Avoid relying only on a cached page, the app icon, a notification, or a loading spinner as proof of success. If only one page has a problem, compare it with another known page to tell a general connection failure from an issue with a specific destination.
With Config, check the active rules and connection log to see how the request was matched. A page may open while the log shows DIRECT, which can mean it matched a direct rule rather than using the proxy server. If a page does not open, first check which rule it matched and which policy it used before switching servers. When reviewing the log, check the time and destination domain so you do not mistake an earlier request for the current result.
For comparison, note the current mode and test result, temporarily switch to Proxy, and revisit the same destination. If Proxy works but Config does not, focus next on the rules and policy references. If both fail, check the server details and network first. To check your regular network, disconnect or temporarily use Direct, but note the original setting and restore the mode you plan to use afterward.
After verification, check how the apps you use every day behave. Some apps keep existing connections or cached data, so you may need to make a new request before checking again. If a problem occurs during use, note the mode, server, test method, and error message. These details are more useful for troubleshooting than simply saying “it won’t connect.”
Settings and Common Troubleshooting Steps
First identify the stage where the failure occurs, then adjust the relevant options in Settings. A subscription that retrieves no entries, a switch that will not stay connected, a failed test, and a problem affecting only certain pages are different issues. Separating them is usually more effective than changing Proxy, TCP, UDP, and other settings at once. If you are unsure what an option does, leave it unchanged.
Import Fails: Check the URL and Entry Fields
If no server entries appear after saving in Subscribe, check that the URL was copied completely, the subscription is still valid, and your current network can reach the subscription address. Updating a subscription first requires a request to that address; do not assume the servers in the list can help make the request. Once you have checked these points, try updating again. If you already have working entries, keep them rather than risking a failed update removing everything.
For a manually added entry, reopen Add Server and compare Type, Host, Port, and authentication details against the original information, then check TLS and transport fields. Do not fill in a password, UUID, hostname, or path from memory. Check the results of a QR code import as well. Saving an entry only means the app accepted the form; it does not prove the remote settings are correct.
Test Fails: Distinguish the Test Method from Actual Connectivity
In Settings, check Test Method, confirm which method is selected, and run Connectivity Test again. If one type of test fails, check access to an actual page before concluding that every connection is unavailable. You can also compare your own Wi-Fi and cellular networks while keeping the server and mode unchanged. If results differ by network, focus on network reachability and related restrictions rather than changing all the server fields at once.
If the switch turns off immediately, first complete system authorization and check the active configuration. If the switch stays on but several tests fail, confirm that the existing server is valid, then review relevant information in Diagnostics. Diagnostics can help identify an issue but will not correct incorrect settings automatically. Record the exact error and when it occurred, then continue based on what you observed.
Config Behaves Unexpectedly: Check Rule Order and Policy References
If Proxy works but Config does not, return to Config and check the active file, Rule order, and policy groups. Common causes include selecting a different configuration, a request matching an unsuitable rule earlier, or a rule referencing a policy with no available server. Do not delete the entire Rule section to try to fix the issue. First identify the rule matching your test destination, change one thing, and test again.
If only a particular domain fails, use the connection log to check its actual destination, resolution result, and matched policy. DNS and rule issues can look similar, so a page error alone may not tell you which one is responsible. Keep the original configuration for comparison and check one thing at a time instead of repeatedly changing subscriptions. Find detailed explanations of rule keywords and protocol fields in the Glossary, or see the FAQ for more troubleshooting scenarios.
Connection Changes Automatically: Check On Demand
If the connection comes back after you disconnect manually, or behaves differently when you switch networks, check whether On Demand is enabled in Settings and review its trigger conditions. It can establish a connection under specified conditions, but cannot make an unreachable server accessible. When troubleshooting for the first time, note the existing conditions, temporarily disable the relevant automatic triggers, and repeat the test using the manual switch. Restore the conditions you need once the basic connection is stable.
Before sharing troubleshooting details, hide credentials in subscription URLs, server authentication information, and records that could identify you. Include only relevant interface labels, error details, and the steps you took. Organize the information as “import method → current Global Routing mode → system connection status → Test Method and result → actual access behavior.” Never show complete connection details in public.
Once you have completed these five steps, keep the settings that work and explore other features as needed. Purchases, App Store storefront regions, and restoring purchases follow a separate process; see the Genuine App Guide for details. This guide ends when you have confirmed that your connection details, mode, and actual access results all match.